How to Use and Assign Boom Cards
Have you heard of Boom cards? If not, you're missing out! I cannot say enough great things about them. Boom cards are interactive, self-checking digital task cards that students complete on the Boom Learning platform.
This blog post will teach you how to use Boom cards.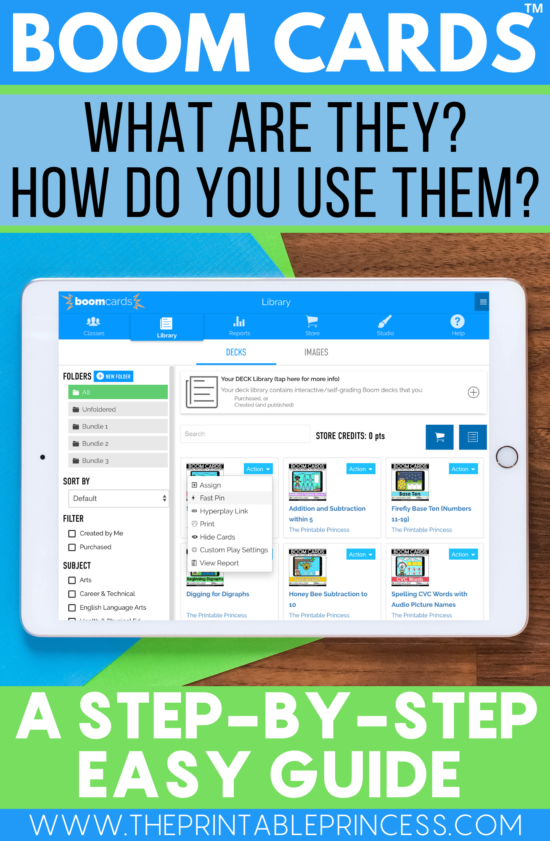
These interactive Boom cards are perfect for distance learning. But they will be great for math and literacy centers once your back in the classroom. They are an easy way to incorporate technology in the classroom. You could even use these as a whole group activity on a Smartboard.
If you're new to Boom, I need to introduce you to a new vocabulary word: deck. A deck is a group of Boom cards. Most of the decks I create include 25-30 cards. So the group of cards is called a deck.
Why should I use Boom Cards?
The most obvious is they are a fun way to learn. They are a different way to learn. Here's a few reasons…in no particular order.
- They are paperless. This means there is no printing, no cutting, laminating – nothing.
- Decks created by The Printable Princess have audio directions as well as audio picture names (when appropriate) for ELA picture names. This way you know students are practicing correctly.
- They are interactive and self-checking. Students submit their answers can get immediate feedback showing them whether their answer was right or wrong. If the answer was incorrect, they get the opportunity to fix it.
- Students can complete these anywhere they have access to a computer, tablet or phone. This means they are great for in school but also at home or for homework.
- You can easily differentiate by assigning different decks to individual students or small groups. Or assign the same deck to your entire class.
- You can assign these via Google Classroom, Seesaw, Class Dojo, Remind, Microsoft Teams, Canvas, and more.
- You can play together on a Smartboard or share your screen during a Zoom call.
- With a Basic membership ($15 a year) and up, you can track data so you can see how your students are doing. That means NO grading for you!
Here's a quick video, you can see Boom cards in action. This group of activities comes from my Boom Cards for Kinder Bundle #1.
Where can I purchase Boom cards?
Boom cards can be purchased directly on the Boom Learning site or on Teachers Pay Teachers.
If you purchase the decks directly on the Boom Learning, the file is automatically added to your Boom library.
If you purchase the decks on Teachers Pay Teachers, you will need to download the PDF (just like you always do for purchases) and click the link the PDF to add the deck to your Boom library.
What do I need to use Boom?
You and your students will also need:
- A computer, tablet, Chromebook, or interactive whiteboard
- An internet browser that is less than 3 years old (such as Safari or Chrome) OR you can use the free Boom app
- An internet connection
Do I need a Boom Learning account?
Yes, in order to use Boom cards you will need to create a Boom Learning account. Boom Learning offers a 90 day free trial. You can click here to set up an account.
After the 90 day trial, they have different membership levels. You can see the different membership options by scrolling to the bottom of this page. Most teachers use either the free version or the $15 a year version.
If you are only using Fast Pins, a free account will work for you. If you are wanting to set up classes and log-ins, easily assign multiple decks to students, and monitor student data, you will need the $15 account.
Using the basic version and higher, you can set up different classes within your Boom account. This allows you to group students so that you can easily assign decks to certain groups of students.
The video below shows you how to set up a classroom:
How do you assign decks to students?
There are several ways you can assign decks to students. If you have created a class, you can assign the decks through the Classes tab. Or you can assign decks through your Boom library.
You can also assign decks using Seesaw, Google Classroom, and other online platforms but for this blog post we will focus on assigning decks through Boom.
Assigning Decks via the Classes tab:
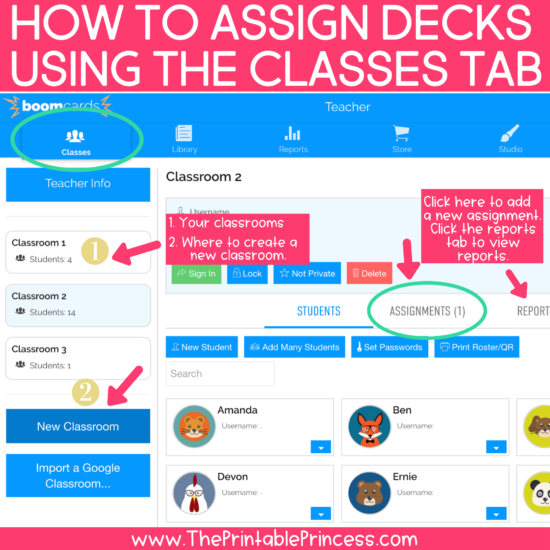
Assigning through the classes tab requires students to sign in with a username and password. You can set the username and password for your students on Boom. This means if students already have a username and password for another program, you can their username and password the same on Boom Learning.
To assign a deck via the Classes tab, click on the classes tab from the blue menu at the top of the Boom Learning site. Select the class on the left column. You can have all of your students grouped in one class or you can create multiple classes allowing you to differentiate the decks you assign.
- Click on “ASSIGNMENTS”. It's located in the white bar above where you see your students in that class.
- Click the blue button that says “Assign More Decks”.
- The decks that you have in your Boom library are here. Click the blue box on the right of the deck(s) that you want to assign. You can assign multiple decks at once.
- That's it. There's no saving or anything else. Just put a check mark in the decks you want students to complete.
- You can view student reports in the REPORTS tab (next to the ASSIGNMENTS tab).
Assigning Decks in Boom Learning:
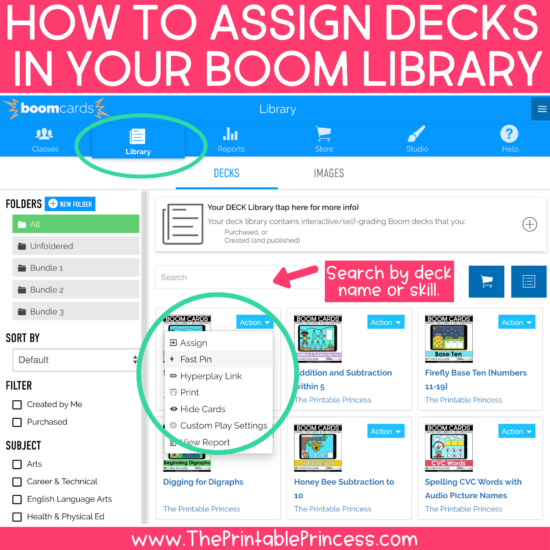
You can also use your Boom library to assign decks to students. You have a few options for assigning in your Boom Library.
- First, locate the deck you want to assign to students. You can use the search bar to search a deck by name or by skill.
- Click the blue action button. A dropdown menu will appear.
- You can choose Assign, Fast Pin, Hyperplay Link.
- Fast Pin – Click Fast Pin to generate a custom URL that you can give to students (via e-mail, Google Classroom, Seesaw, etc). This method does not require students to sign-in. You can use this method with a free or paid Boom Learning account. — You can also use this method in the classroom. Write the letter code on the board and have students type the code in the Boom Learning site or app.
- Hyperplay Links – Copy and paste the link and distribute to students the same way you would with Fast Pin. This does require students to sign in.
- Assign – allows you to quickly assign decks to your class or classes that you set up.
What is the difference between Fast Pin and Hyperplay Links?
The biggest difference between Fast Pin and Hyperplay links is that students do not need to sign-in with Fast Pin, but they do need to sign in with Hyperplay links.
Hyperplay links track data (thus the signing in) allowing you to progress monitor and generate reports. Fast Pin links do not track data. Fast pin links are only active for 14 days. After that you will need to generate a new link.
I hope that helps answer some of your questions and gives you an idea of how to use Boom cards. Feel free to send me a message if you have any other questions or need additional assistance. I'm happy to help!
If you're ready to start adding Boom cards to your classroom, you can find them here on Teachers Pay Teachers and here on the Boom Learning website.

Similar Posts
2 Comments
Leave a Reply
You must be logged in to post a comment.
How come I can’t print out, How to use boom cards? I know I won’t remember all this when I go and try to do this!
Hi Lisa,
I’m not sure why you wouldn’t be able to print the blog post. You might want to check your browser settings or printer settings. In addition, you are welcome to bookmark this blog post so that you can refer back to it as needed. Or you can contact me with any questions. https://www.theprintableprincess.com/contact-me/
Thanks so much,
Melissa